Introduction
Thank you for using Ring.io! This page will help you get started with Ring.io. You'll be up and running in a jiffy!
Getting Started
The Ring.io CRM API is a RESTful API that allows you to read and write Ring.io data, such as contacts, notes, phone calls and users.
With the API you can develop integrations with CRM systems, such that when Ring.io users get phone calls, the callers can be identified from information stored in a CRM system. You can also enrich the CRM with data captured by Ring.io, such as logging phone calls as interaction records in the CRM.
You can use the API privately, for your own purposes, or you can publish your API integration as a plugin in the Ring.io CRM Marketplace.
API Instructions
To use the API you need a Ring.io account (sign up, let us know and we’ll make your account Lucky Free) and a security token.
Sign up for Ring.io. Then click on Plugin Marketplace. Then click on Create my own plugin. Then enable API access to your account data. More about authentication.
With this token you have access to your own data. If you want to access other’s data you will need to publish your plugin, and the administrators of the accounts you wish to access will have to authorize your plugin.
Format
The REST API is implemented as JSON over HTTP using all four REST verbs – GET, POST, PUT and DELETE. Every resource, like contact, note or ring, has their own URL and is manipulated in isolation. In addition, for most resources, we offer a helper Feed that will return a delta or aggregated view of what has changed since the last time that the feed was called. E.g. : HTTP GET http://api.Ring.io.com/feeds/users/{userId}/contacts?since={timestamp} returns the contacts for a given user that have been created, updated and deleted since the indicated timestamp.
All timestamps sent to and returned from the API are formatted using ISO 8601.
API Versioning
The base URL for all Ring.io API services is http://api.Ring.io.com/api/1/. The number following /api/ in this URL scheme is the API version number. As we add functionality to the API, we’re going to roll out new version numbers of the API. If we ever need to stop supporting old versions of the API, we’ll provide a deprecation period to update the version, then start returning HTTP 404 for all URLs matching that version. New versions of the API and deprecation notices will be advertised on the Developer Blog.
Response codes
200: You get this response code if the HTTP request was successful.
402: You get this response code if the account you’re trying to access has been cancelled by the customer or temporarily disabled due to late payment. The account will not be available for API actions until payment has been submitted.
404: You get this response code if the id is not found (or is found, but it belongs to an account your code is not authorized to access. You will also get this error if you’re using an API version that is no longer supported. See the section above on API Versioning for more details.
410: You get this response code if the account you’re trying to access has been blacklisted or deleted permanently.
500: You get this response code if an error happens in the server or if the data presented to the server is invalid or missing.
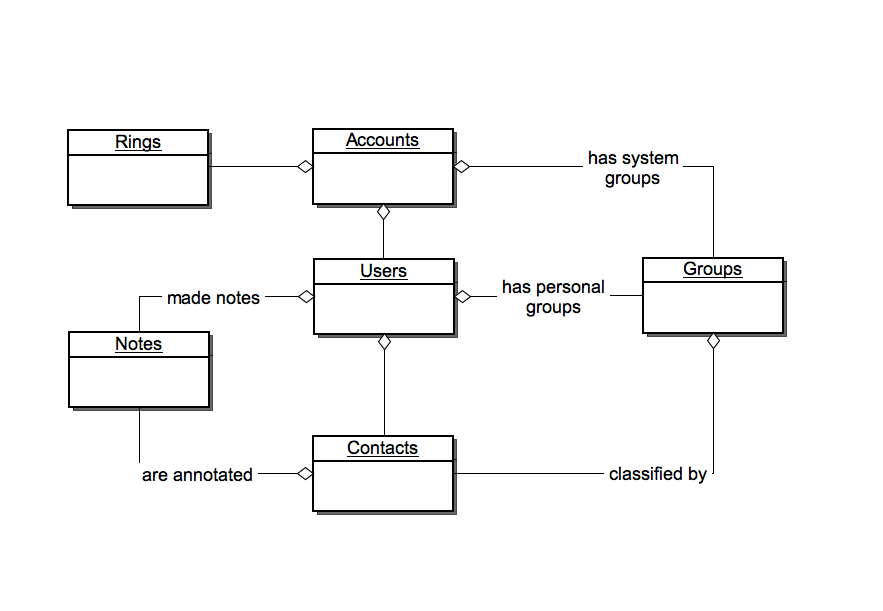
Data model
Authentication
In order to use the CRM API you must obtain a token from the Ring.io admin website. This token uniquely identifies your API code and, when presented to the system, is proof that you are authorized to access the data in your account.
To obtain a token log in to your Ring.io account and select the CRM section. Simply check “Enable access to my account data via the CRM API” and copy the token. If you ever re-generate the token, the old token becomes invalid.
Ring.io uses Basic HTTP Authentication. To use the token in an API call, encode the token with Base64 and place it in the Authentication header as login and leave the password blank (or use a dummy password, it will be ignored).
For example, let’s suppose that your token is: qwertyuiop123456789sdfghjkl4567dfghjkcvbnmrty
Curl
Curl is a command-line tool to transfer data from or to a server. We will use the token (not encoded) as the user, X as the dummy value for the password, and http://apiURL as the dummy desired URL for the request:
curl -u qwertyuiop123456789sdfghjkl4567dfghjkcvbnmrty:X http://apiURLPseudo-code
var token = "qwertyuiop123456789sdfghjkl4567dfghjkcvbnmrty" // your token
var encoded = base64(token + ":")
http.setHeader("Authorization", encoded)
Java
You can use HttpClient to make your requests. For that purpose, you should use preemptive authentication so that each request will include authentication, not only when the server requests it
String token = "qwertyuiop123456789sdfghjkl4567dfghjkcvbnmrty"; // your token
client.getParams().setAuthenticationPreemptive(true);
Credentials defaultcreds = new UsernamePasswordCredentials(token, "");
client.getState().setCredentials(new AuthScope("api.Ring.io.com", 80, AuthScope.ANY_REALM), defaultcreds);
Ruby on Rails
Assume YourClass inherits from ActiveResource
YourClass.user = 'qwertyuiop123456789sdfghjkl4567dfghjkcvbnmrty'Contacts
Contacts represent entries in an address book. Every user has his own contacts so every contact always belongs to only one user.
Contacts can be tagged or classified in groups. Ring.io creates 6 pre-defined system groups for all users, and –in addition– allows each user to create their own groups.
If a contact belongs to the “Clients” group, it will be a shared contact that all users in the account can see. Other users will be able to modify the contact, but not delete it.
Contact properties
Contact
| name | type | mandatory | Description |
|---|---|---|---|
|
id |
string |
Yes if updating. |
The Contact ID to update. When creating, this property is ignored. |
|
title |
string |
no (*) |
The business title |
|
name |
string |
no (*) |
The full name of the contact |
|
about |
string |
no |
About field for the contact |
|
gender |
string |
no (*) |
Either "male" or "female" |
|
business |
string |
no (*) |
Name of the company that the contact works at |
|
data |
A collection of fields. |
no (*) |
See the field properties below. The list can be empty and it can contains more than one field of the same type. |
|
groups |
A collections of ids |
no |
A collection of group IDs. Groups are ways to tag a contact, such as "VIP", or "Client" Is a id list with all groups that the contact belongsto. Yo can get this groups ids querying to the api: See http://dev.Ring.io.com/documentation/groups/ |
|
hidden |
boolean |
no (read only) |
only) True if the contact is not visible by the users |
(*) You need to set at least one of the starred fields. A contact cannot be completely blank.
JavaScript
$.get('http://yoursite.com/test/' + id, function(data) {
    console.log(data);
});
Acceptable values for the data property
| name | type | mandatory | description |
|---|---|---|---|
|
type |
string |
yes |
one of these: "telephone", "email", "address", "website" or "im" |
|
value |
string |
yes |
The real value of the field |
|
rel |
string |
yes, but "rel" and "label" are exclusive. You can't use them together: you can use only one of them in the same field. |
A fixed value that explains what kind of type is this field If type is "telephone": work if type is website work If type is email, address or im work |
|
label |
string |
yes, but "rel" and "label" are exclusive. You can't use them together: you can use only one of them in the same field. |
If rel is not specified, you can set in the label any value that you want. |
|
isprimary |
boolean |
no (default = false) |
A value true or false |
Contacts Feed
Get contacts for a user
HTTP GET http://api.Ring.io.com/api/1/feeds/users/{userId}/contacts
HTTP GET http://api.Ring.io.com/api/1/feeds/users/{userId}/contacts?since={timestamp}
HTTP GET http://api.Ring.io.com/api/1/feeds/users/{userId}/contacts?hidden={hidden}
HTTP GET http://api.Ring.io.com/api/1/feeds/users/{userId}/contacts?all={all}
* {userId} = Is the id of the user who owns the contacts.
* {timestamp} = timestamp obtained in a prior call to this method. It indicates a desire to obtain only a delta of the contacts that have changed/have been created and deleted. Optional: (can be empty). Empty means “give me all contacts”
* {hidden} = When set to true, returns both hidden and non-hidden contacts. When set to false, returns only non-hidden contacts only. Defaults to false when parameter isn’t specified.
* {all} = When set to false, returns only contacts created by other plugins, hiding changes made by the plugin who owns the current token. When set to true, also returns changes made by this plugin. Defaults to false when parameter isn’t specified.
Get contacts for a all the users in an account
HTTP GET http://api.Ring.io.com/api/1/feeds/accounts/{accountId}/contacts
HTTP GET http://api.Ring.io.com/api/1/feeds/accounts/{accountId}/contacts?since={timestamp}
* {accountId} = Is the id of the account who owns the users for which the contacts are desired.
* {timestamp} = timestamp obtained in a prior call to this method. It indicates a desire to obtain only a delta of the contacts that have changed/have been created and deleted. Optional: (can be empty). Empty means “give me all contacts”
* {hidden} = When set to true, returns both hidden and non-hidden contacts. When set to false, returns only non-hidden contacts only. Defaults to false when parameter isn’t specified.
* {all} = When set to false, returns only contacts created by other plugins, hiding changes made by the plugin who owns the current token. When set to true, also returns changes made by this plugin. Defaults to false when parameter isn’t specified.
JSON Response
Status code: 200
{
    "deleted": [
        "3",
        "4"
    ],
    "timestamp": "2011-12-30T19:44:48.396Z",
    "updated": [
        "1",
        "2"
    ]
}
* updated, the contacts by id that are new or have been modified since the last timestamp sent.
* deleted, the contacts by id deleted since last timestamp.
* timestamp, the date timestamp of this request. You have to store this value and send it again in the since parameter the next time to get only fresh data (delta).
Create
HTTP POST http://api.Ring.io.com/api/1/contactsJSON to POST example
{
    "contact": {
        "business": "Paradigma",
        "data": [
            {
                "is_primary": true,
                "rel": "work",
                "type": "telephone",
                "value": "+15717483198"
            },
            {
                "rel": "home",
                "type": "telephone",
                "value": "+15717483198"
            },
            {
                "rel": "work",
                "type": "email",
                "value": "example@Ring.io.com"
            },
            {
                "rel": "home",
                "type": "address",
                "value": "Example 24, New York"
            },
            {
                "rel": "work",
                "type": "website",
                "value": "http://example.com"
            },
            {
                "rel": "work",
                "type": "im",
                "value": "example@hotmail.com"
            }
        ],
        "gender": "male",
        "groups": [
            "1",
            "2",
            "3",
            "4",
            "5",
            "6"
        ],
        "name": "Test",
        "owner_id": "711082",
        "title": "Title"
    }
}
* “owner_id” is the id of the user who should own this contact. It’s mandatory. If the owner_id is not found, represents a user who belongs to another account which has not authorized you to access their data, is missing or blank, this error is sent (with a 404 status code):
{"error":{"message":"User owner not found"}}* “data” is a field list with information about the contact. This field list can be empty or can contain more than one element of the same type.
* “groups” is an id list with all the groups that the contact belongs to. Use the groups resource to get more details about a specific group.
* The rest of the fields are optional, but you must send at least one of these: “name”, “business” or one data element of any type in the “data” field list. If not, you will get this error (with an HTTP 500 status code):
{"error":{"message":"Can not create an empty contact"}}JSON Response
Status code: 200
{
    "contact": {
        "date_created": "2011-12-30T20:00:47.432Z",
        "id": "711176"
    }
}
Read
HTTP GET http://api.Ring.io.com/api/1/contacts/{contactId}* {contactId}: the id of the contact to read.
JSON Response
{
    "contact": {
        "about": null,
        "business": "Ring.io",
        "created_by": "you",
        "data": [
            {
                "is_primary": false,
                "rel": "home",
                "type": "address",
                "value": "Example 24, New York"
            },
            {
                "is_primary": true,
                "rel": "work",
                "type": "telephone",
                "value": "+12025551212"
            },
            {
                "is_primary": false,
                "rel": "work",
                "type": "website",
                "value": "http://example.com"
            },
            {
                "is_primary": false,
                "rel": "work",
                "type": "email",
                "value": "example@Ring.io.com"
            },
            {
                "is_primary": false,
                "rel": "home",
                "type": "telephone",
                "value": "+12025551212"
            },
            {
                "is_primary": false,
                "rel": "work",
                "type": "im",
                "value": "example@hotmail.com"
            }
        ],
        "date_created": "2011-12-30T20:00:47.000Z",
        "gender": "male",
        "groups": [
            "3",
            "2",
            "6",
            "5",
            "4"
        ],
        "hidden": false,
        "id": "1",
        "last_updated": "2011-12-30T20:00:47.000Z",
        "name": "Test",
        "owner_id": "1",
        "title": "Title"
    }
}
* “created_by” can be “you” or “Ring.io”.
Update
HTTP PUT http://api.Ring.io.com/api/1/contacts/{id}* “id”: The id of the contact to be updated
JSON to PUT
Same as in create method, but owner_id is ignored because you can’t change the owner of a contact (you have to delete it and create it again under another user).
PLEASE NOTE: If you are going to modify the “data” property, you will need to send all its underlying items, even if only some have changed. If you send in an empty “data” field is equivalent to deleting all the underlying items. If you don’t send the “data” field or if it is sent as “null” then Ring.io will ignore this value and will leave the data field list untouched.
JSON Response
Status code: 200
{
    "contact": {
        "id": "711176",
        "last_updated": "2011-12-30T20:02:57.611Z"
    }
}
Delete
HTTP DELETE http://api.Ring.io.com/api/1/contacts/{id}JSON Response
Status code: 200
{
    "contact": {
        "date_deleted": "2011-12-30T20:03:19.305Z",
        "id": "711176"
    }
}
Other errors
Error parsing JSON (invalid quotes, brackets, commas,…) in update or create operations
{"error":{"message":"Error parsing JSON. xxxxxxxxxxxx"}}
Where xxxxxxxxxxxx is an explanation of error.
Example:
{"error":{"message":"Error parsing JSON. Expected a ':' after a key at character 22 of
 {\"group\":{\"owner_id:,\"name\":\"test group\",\"description\":\"aaaa\"}}"}}
Groups
Groups are tags that aggregate a subset of contacts. Any user may create their own groups to classify contacts in their address book. Do not confuse groups (which apply to contacts) with departments (which apply to users, and can be read using the account resource)
Groups created by a user are only visible to that user. Different users may classify a shared contact under different groups.
There is a special set of predefined groups created by the system: These groups cannot be deleted or modified.
- VIP
- Blacklist
- Friends
- Clients
- Family
- Coworkers
A contact may only belong to the VIP or Blacklist group, or neither, but not both.
The Clients group is a special group which, if used to tag a contact, makes that contact visible to all the users in an account. Any contact classified as a Client can be also modified by other users, but not deleted. If a contact tagged as a Client is untagged as a Client then the contact will disappear from other users’ views.
Groups Feed
HTTP GET http://api.Ring.io.com/api/1/feeds/users/{userId}/groupsuserId: The id of the user who owns the groups.
JSON Response
Status code: 200
[
    "1",
    "2",
    "3",
    "4",
    "5",
    "6"
]
A list containing the id of each group. Some of these groups can be Ring.io system groups.
Read
HTTP GET http://api.Ring.io.com/api/1/groups/{groupId}groupId: The id of the group to read
JSON Response
Status code: 200
{
    "group": {
        "created_by": "Ring.io",
        "date_created": "2009-11-30T00:00:00.000Z",
        "description": "",
        "id": "1",
        "last_updated": "2009-11-30T00:00:00.000Z",
        "name": "VIP"
    }
}
“created_by” field can be “Ring.io” or “you”. “Ring.io” means a system group, “you” means that this group is created by you.
Create
HTTP POST http://api.Ring.io.com/api/1/groupsJSON to POST
{"group":{"owner_id":"8","name":"Platinum Support","description":"Clients who have paid for premium support"}}owner_id is the user owner of the group. It is mandatory. If the owner_id is not found, represents a user who belongs to another account which has not authorized you to access their data, is missing or blank, this error is sent (with a 404 status code):
{"error":{"message":"Group not found"}}
name is required
description is optional (can be empty, null or missing)
JSON Response
Status code: 200
{
    "group": {
        "date_created": "2011-12-30T17:43:14.428Z",
        "id": 4550
    }
}
Update
HTTP PUT http://api.Ring.io.com/api/1/groups/{groupid}groupId: The id of the group to update. You can’t update system groups.
JSON to POST
{"group":{"name":"Platinum Support","description":"Clients who have paid for premium support"}}JSON Response
Status code: 200
{
    "group": {
        "id": 4550,
        "last_updated": "2011-12-30T17:43:14.000Z"
    }
}
Delete
HTTP DELETE http://api.Ring.io.com/api/1/groups/{id}groupId: The id of the group to delete. You can’t delete system groups.
JSON Response
Status code: 200
{
    "group": {
        "date_deleted": "2011-12-30T17:48:21.842Z",
        "id": "4550"
    }
}
Create and update errors
HTTP Response: 500
Error parsing JSON
{"error":{"message":"Error parsing JSON. xxx"}}
Where xxx is an explanation of error, like "Expected a ':' after a key at character 22 of {\"group\":{\"owner_id:,\"name\":\"Grupo de prueba\",\"description\":\"aaaa\"}"
A required field is missing (or invalid type)
{"error":{"message":"These fields are invalid: [fieldnames]"}}
Where fieldnames is a list with the invalid fields, separated by commas
Example:
{"error":{"message":"These fields are invalid: [name]"}}Rings
Rings represent phone calls or call data records, voicemails or callback requests. Rings are created by the system when a phone call is complete, are read-only and cannot be modified or deleted.
Ring Properties
In this table, where a property states “required” it means that the system will always present that property in a returned resource. Optional properties may or not appear in the response.
| Property | Description |
|---|---|
|
id |
A unique identifier for this phone call, sometimes called a Ring ID |
|
called_number |
The number the call was transferred out to (Required) |
|
number_label |
A text string representing the purpose of the Ring.io number that that was called - e.g. "Marketing Hotline" |
|
contact_number |
Phone number of the contact that called or that was called |
|
callerid |
The caller ID of the caller (Required) |
|
number_dialed |
The phone number that was dialed by the caller |
|
start_time |
The time and date the call started (Required) |
|
duration |
Duration of the call in milliseconds (Required) |
|
outcome |
The outcome for the call. Possible values are {"Completed", "Scheduled", "Missed", "Callback", "Voicemail", "Incompleted"} (Required) |
|
voicemail |
URL where the voicemail can be reached in case the outcome was "Voicemail" (Optional) |
|
call_recording |
URL where the call_recording can be reached if the account has call recording and some portion of the call was recorded (Optional) |
|
kind |
The kind of call, can be "personal" or "team" (Required) |
|
department |
The department name in case of a department call (Optional) |
|
from_id |
The unique identifier within Ring.io of the User or Contact that made the call |
|
from_type |
The type within Ring.io for the whom made the call, this can be "contact" or "user" |
|
from_name |
The name of the contact or user that originated the call |
|
from_company |
The name of the company of the contact that originated the call |
|
to_id |
The unique identifier within Ring.io of the User or Contact that received the call |
|
to_type |
The type within Ring.io for the whom received the call, this can be "contact" or "user" |
|
to_name |
The name of the contact or user that is receiving the call |
|
to_company |
The name of the company of the contact that is receiving the call |
|
remote.id |
These 3 properties describe a CRM object used to represent the phone call in the CRM. The remote.id is the unique identifier of that object, the remote.url is a user-clickable URL that opens a web page view of that object, and the remote.url_label is a text string to describe how to label that resource in the Ring.io UI (E.g. "SF Lead") |
|
ring_local |
ring_local is a boolean that is set to true if RingLocal was used to make this outbound call and ring_local_number is the Ring.io phone number that was displayed to the contact that was called. |
|
voicemail_drop |
a text string with the name of the voicemail drop audio message that was used, if the user dropped a voicemail when connecting with the caller. |
Rings Feed
HTTP GET http://api.Ring.io.com/api/1/feeds/accounts/{accountId}/rings
HTTP GET http://api.Ring.io.com/api/1/feeds/accounts/{accountId}/rings?since={timestamp}
{accountId} = Is the id of the account who owns the rings.
{timestamp} = timestamp obtained in a prior call to this method. It indicates a desire to obtain only a delta of the rings that have been created since the last call. Optional: (can be empty). Empty means “give me all rings”
JSON Response
{
    "timestamp": "2011-12-30T17:53:51.095Z",
    "updated": ["1", "2"]
}
updated, the rings by id that are new since the last timestamp sent.
timestamp, the date timestamp of this request. You have to store this value and send it again in the since parameter the next time to get only fresh data (delta).
Read
HTTP GET http://api.Ring.io.com/api/1/rings/{ringId}{ringId} = Ring identifier
JSON Response
{
    "ring": {
        "called_number": "202-555-1212",
        "callerid": "202-555-1212",
        "department": "operator",
        "duration": 15145,
        "from_id": "711081",
        "from_type": "user",
        "id": "1",
        "kind": "team",
        "number_dialed": "202-555-1212",
        "outcome": "Missed",
        "start_time": "2011-12-30T18:02:57.000Z",
        "to_id": "711081",
        "to_type": "user"
    }
}
Send SMS
Send SMS programatically on behalf of a user in your CRM. We use the Caller ID selected selected in the Web Phone when sending SMS
Send SMS as a specific user
HTTP SEND http://api.ringio.com/users/{userID}/sendSms{userID}: the ID of the user.
JSON Response
{

   {"code":200,"message":"Successful."}

   }
Accounts
Accounts represent companies. Each account is one Ring.io customer. Accounts are read-only and cannot be modified or deleted. Accounts have users.
Read
HTTP GET http://api.Ring.io.com/api/1/accounts/{accountId}{accountId}: the id of the account to read
JSON Response
{
    "account": {
        "admin": {
            "email": "sample@Ring.io.com",
            "first_name": "Ring.io",
            "id": 1,
            "last_name": "Sample",
            "phone_number": "703-555-1212"
        },
        "country": "US",
        "created_by": "Ring.io",
        "blacklisted": false,
        "date_created": "2010-05-10T00:00:00.000Z",
        "departments": [
            {
                "id": "1",
                "name": "sales"
            },
            {
                "id": "2",
                "name": "technical support"
            }
        ],
        "id": "1",
        "last_updated": "2011-12-28T11:05:49.000Z",
        "name": "Ring.io",
        "remote_id": null,
        "seats": 99999
    }
}
Users
Users belong to accounts and generally represent employees / coworkers / teammates in the same company. Users may have contacts in their address book.
Users are read-only and cannot be deleted or modified via the API.
User feed
HTTP GET http://api.Ring.io.com/api/1/feeds/accounts/{accountId}/users
HTTP GET http://api.Ring.io.com/api/1/feeds/accounts/{accountId}/users?since={timestamp}
{accountId} = Is the id of the acount who owns the users.
{timestamp} = timestamp obtained in a prior call to this method. It indicates a desire to obtain only a delta of the users that have changed/have been created and deleted. Optional: (can be empty). Empty means “give me all users”
JSON Response
Status code: 200
{
    "deleted": [
    "1",
    "2"
  ],
    "timestamp": "2011-12-30T17:05:31.941Z",
    "updated": [
        "3",
        "4",
        "5",
        "6"
    ]
}
updated, the users by id that are new or have been modified since the last timestamp sent.
deleted, the users by id deleted since last timestamp.
timestamp, the point in time of this request. You have to store this value and send it again in the since parameter the next time to get only fresh data (delta).
Read
HTTP GET /users/{userId}{userId}: the id of the user you are interested in reading.
JSON Response
{
    "user": {
        "created_by": "Ring.io",
        "date_created": "2009-11-30T00:00:00.000Z",
        "departments": [
            "1"
        ],
        "email": "sampleUser@Ring.io.com",
        "id": "3",
        "last_updated": "2011-12-15T13:52:00.000Z",
        "name": "Sample User",
        "status": "Active"
    }
}
“created_by” can be “you” or “Ring.io”.
“status” can be: “Admin” (if the user is the account owenr), “Not invited” (if the user is created in the admin site but not invited yet) or “Invited” (if the user is created and invited).
“departments” The id of the departments that this user belongs to. You can see all the departments in the company by reading the account info.
Make a call
HTTP POST /users/{userId}/callJSON to POST
{
    "call": {
        "dstNumber": "{e164_number}"
    }
}
{userId} = Is the id of the user to place the call from.
{e164_number} = Is number to place the call to.
JSON Response
Status code: 200 is returned if the call is being made.
If there is an error, the error reason is returned in the following format:
{
    "error": {
        "message": "Invalid phone number"
    }
}
Possible errors are:
Invalid phone number: returned if the phone number is not recognized as a valid number.
Cannot place a call while in a call: returned if the user is currently in another call.
Your token does not provide access to user ID {userId}: returned if your api token doesn’t have access to the user.
How it works
Once you make the API call described above, our servers place a call to the user’s, as defined by {userId}, end-points. Once the user answers, we make a call to the destination number.
Show a screen pop
HTTP POST /users/{userId}/screenPopJSON to POST
{
        "caller_id": "{e164_number}"
}
{userId} = Is the id of the user to pop.
{e164_number} = Is number that is calling.
JSON Response
Status code: 200 is returned regardless of whether the pop is shown or not. 200 just signals that the request was accepted. The reasons the user might not see the pop are as follows:
User is checked out.
User is currently in another call.
How it works
Once you make the API call described above, our servers place a push a notification to the user’s desktop indicating with the supplied caller_id number. If the caller id matches a contact, then the desktop will show the pop with any information we have on the contact. If not, just the caller id is displayed.
Webhooks
The Ring.io CRM API implements a set of callback interfaces that can drastically simplify your integration if you prefer an event-driven approach over a batch, stateless approach offered by our REST resources.
Syntax details
Ring.io is going to make HTTP GETs to your web script and dynamically insert values for parameters based on what you entered in the Webhook URLs.
You can find the interface for specifying the webhooks in your Ring.io account under “CRM Integrations” > API Access > Webhook URLs.
For example, if you enter:
http://yourserver.com/ringStarted?id={AccountId}&ringId={RingId}&contactId={ContactId}&contactNumber={ContactNumber}&selfNumber={SelfNumber}
When a call comes in, and Ring.io wants to notify your script it will send:
http://yourserver.com/ringStarted?id=2902&ringId=1879985&contactId=589951&contactNumber=7038797950&selfNumber=8887275776
It would be your “ringStarted” script’s job to parse the parameters and do useful things with the information. A common pattern is that you will then use the identifiers passed to fetch more info from Ring.io using other API calls, and then finally store all this info in a system that you care about, like an order processing system, or your own backend.
Available Events
Ring.io can notify your app of the following events:
| Name | Inbound Call | Outbound Call | Irrespective of call direction |
|---|---|---|---|
|
Start Ring |
As soon as a caller calls a Ring.io Number |
As soon as a user makes an outbound call —> and the user is being tried. | |
|
End Ring |
When the call ends. |
When the call ends. | |
|
Receiving a call |
As soon as a user is being tried |
n/a | |
|
Answered a call |
As soon as the user picks up (both legs are talking) |
As soon as the contact (2nd leg) has answered and the user and contact are talking (both legs are talking) | |
|
Dialed a call |
n/a |
As soon as a user picks up the call and the contact (2nd leg is being tried) | |
|
Contact created |
Ring.io has created a contact on behalf of a user or on behalf of a CRM plugin | ||
|
Contact edited |
An existing contact has been edited with updated information | ||
|
Contact deleted |
An existing contact has been deleted | ||
|
Note created |
A new note about a contact has been created |
Tokens available for use in Callbacks
Tokens are markers surrounded by curly braces that you can put in the callback URL and Ring.io will replace it at runtime with the corresponding value for that token when it calls your callback script.
| Token Name | Description |
|---|---|
|
{AccountId} |
Your Account ID. While you may know your Account ID if you’re using web hooks for your own private purposes, if you develop a plugin for multiple Ring.io customers to use, the AccountID will vary according to which particular customer is calling your script. You can use in conjunction with the /accounts REST call to get account details, or as the basis for many of the other REST calls available in the Ring.io CRM API. |
|
{RingId} |
The Ring ID of the phone call. A Ring ID is a unique call identifier that you can use to fetch details about the phone call, with the /rings resource of the REST API |
|
{ContactId} |
The ID of the contact that is calling or that is being called. A Contact ID is a unique identifier that you can use to fetch details about the party that is calling the user or that the user is calling out to, via the /contacts resource of the REST API |
|
{ContactNumber} |
The 10 digit phone number of the contact who is calling (aka Caller ID or ANI) or that is being called |
|
{UserCallerId} |
The 10 digit Ring.io phone number that was called by the contact or that is being used by the system as CallerID for an outbound call. |
|
{UserPersonId} |
The id of the user that is a party to a call. |
|
{UserPersonsIds} |
(note last 's') The ids of the users that are being tried -- when Ring.io tries multiple users at once. Separated by commas. |
|
{Direction} |
If an inbound call (a call that a contact initiated), it is set to "incoming". If an outbound call (a call that a user initiated, or initated via the API on behalf of a user), it is set to "outgoing". |
|
{NoteId} |
The ID of a note that was created. |
|
{HashAccountId} |
(Rare that you need to use this) If you are a plugin developer, and want to secure the passing of Account IDs to your multi tenant CRM integration script, this parameter gives you a SHA256 hash or digest of the Account ID of the Account that is getting the phone call and the API token of the Account ID of your Ring.io Developer account (“the plugin publisher”). To generate the hash feed the accountID + APIToken to: openssl dgst -sha256 |
Which tokens are available in which callbacks?
Making a Ring.io plugin
A plugin is a mechanism for packaging and distributing a multi-user CRM integration between Ring.io and a CRM system. If you create a plugin and publish it, any Ring.io user will be able to benefit from your code and connect the data in their CRM account with Ring.io and viceversa.
We use the term CRM broadly: it could be any data source. Some examples to get you thinking: Outlook, a Google Spreadsheet, Jigsaw, and of course Salesforce.com, SugarCRM, Microsoft Dynamics, Netsuite, SAP, etc.
When you publish your plugin it appears as an installable module inside every Ring.io customer account. All the Ring.io customer does is authorize the plugin (so you can access their account data), and fill out a configuration screen that you design and serve from your own web server, but which appears under an IFrame on your plugin’s page.
Typical things one would collect on a plugin configuration page are credentials for the CRM and configuration options for your code.
Why create a plugin?
There are different valid reasons to develop a plugin.
- You ‘had an itch to scratch’ and wrote code for yourself that you think others would find useful and turning it into a plugin makes it easy for others to reuse your code
- You work for a CRM company and would like your users to phone-enable the CRM. More users = more money for your company. Happier users = stickier product = less churn
- You are a consultant that makes money selling CRM solutions to clients and with a plugin you can solve a common integration pain: CRM to CTI.
- You are an entrepreneur interested in earning licenses from the Ring.io customer base, selling your integration to them, and/or reselling Ring.io to your customers or channel
Plugin development overview
Step 1: Start by developing a one-user CRM integration script that uses your account’s private data. In doing so, you will probably write a specification similar to the one in our Highrise CRM sample implementation.
Step 2: Add the multi-user provisioning hooks described below
Step 3: Request publication of your plugin
Step 4: Once approved, your plugin is ready for any Ring.io customer to use.
Step 1: Private integration
To use the API you need a Ring.io account (you can sign up for free) and a security token.
Sign up for Ring.io. Then click on Plugin Marketplace. Then click on “Make my own plugin”. Then enable API access to your account data. More about authentication.
With this token you have access to your own data. You will not have access to other account’s data until you have a published plugin and other Ring.io administrators install and authorize your plugin.
Step 2: Multi-user provisioning hooks
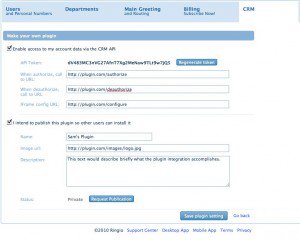
In the “Make my own plugin” page click on “I intend to publish the plugin”.
Then enter URLs for the following.
- Authorization URL: This is the URL on your website that Ring.io will call to let your code know that a Ring.io customer has installed your plugin. (You won’t get calls to this URL until a Ring.io support person publishes your plugin)
- De-Authorize URL: This is the URL on your website that Ring.io will call to let your code know that a Ring.io customer is uninstalling your plugin. This is Ring.io’s notice to your code so it stops using the customer’s data, since the end customer is revoking their permission. If you try to access the customer data after the De-Authorize URL is called you will get an HTTP 403: Forbidden error.
- IFrame Config URL: While the first 2 URLs were used to programmatically notify your server, the IFRame URL should be the resource of a web page that will be shown to each Ring.io customer wishing to configure the plugin. Common things you would collect in this GUI: CRM login credentials, mapping of users between Ring.io and the CRM system, plugin configuration settings (e.g. sync frequency). Additionally, you may want form actions to Save the data on your web server, and a Test button that performs a simple operation with all the components so the user knows that the plugin is successfully configured.
This approach means that, if you want to have a plugin you must have a web server up and running. It doesn’t matter what web scripting language you use (PHP, Rails, JSP, etc) as long as Ring.io can send HTTP requests to let your server know that a user has installed, uninstalled the plugin or is simply opening the plugin configuration IFrame that you will be serving.
Authorize URL syntax
When Ring.io calls the Authorize URL, it will search and replace the literal {AccountId} with the ID of the account that is installing the plugin. So, you can set the Authorize URL as: http://yourdomain.com/authorize?id={AccountId}
And Ring.io will call to your application with a URL like this: http://yourdomain.com/authorize?id=11
Generally speaking, you would want to store that ID in a database or other permanent store so that you may use the ID in subsequent API calls to access the data in that account. A typical pattern may be to first fetch the account info, then read the users, then get the rings in the account. Finally, for each user you could read, modify or delete their groups, notes and contacts. Please be mindful that customers highly value their data and would be unhappy if your code did not treat it responsibly.
The only time during which Ring.io sends the ID of the account is when it invokes the Authorize URL. During subsequent calls to the plugin (to de-authorize or to render the IFrame) Ring.io will use instead a hash composed of the ID of the account and your API token.
You should, therefore, generate the hash of the ID and the token and store it on your side, when the Authorize URL is invoked. See below for details on how to generate the hash.
Deauthorize URL and IFrame URL syntax
When Ring.io calls the Authorize and IFrame URLs, it will search and replace the literal {HashAccountId} with a hash of the ID of the account in question. If you set these URLs as:
http://yourdomain.com/deauthorize?hashid={HashAccountId}
http://yourdomain.com/iframe?hashid={HashAccountId}
Ring.io will invoke your plugin with a URL like this:
http://yourdomain.com/iframe?hashid=e16f38d96ea59d44cc649e32fd3fcadd740ee254ed3b05a74cd179513005d6dc
It’s your plugin’s responsibility to calculate the hash in advance and store it, such that when Ring.io invokes one of these URLs you will be able to search for the hash in your local persistent store and find the real Account ID and corresponding information.
Lifecycle of a plugin and URL callbacks.
Let’s suppose your plugin configuration is as follows:
- Authorize URL: http://yourdomain.com/authorize?id={AccountId}
- De-Authorize URL: http://yourdomain.com/deauthorize?hashid={HashAccountId}
- IFrame Config URL: http://yourdomain.com/iframe?hashid={HashAccountId}
And a Ring.io administrator with Account ID = 45 wants to install your plugin.
- The administrator starts the plugin installation by clicking on the “Authorize” button: Ring.io invokes the Authorize URL: http://yourdomain.com/authorize?id=45
- Your plugin code obtains the ID of the Account, generates the hash and creates a new account in your local store, with the ID of the account and the hash that you just generated.
- The administrator needs to configure your plugin: Ring.io invokes the IFrame Config URL as follows: http://yourdomain.com/iframe?hashid=e16f38d96ea59d44cc649e32fd3fcadd740ee254ed3b05a74cd179513005d6dc and renders the response inside an IFRAME in the administrator’s web browser window. When your plugin gets the request you would normally read the hash and search in your local store the data to display in a configuration form with the account information you wish to collect, and with a hash as a hidden field.
- The administrator submits your form, sending over to your plugin server the data you defined in the hash. In your plugin, when you receive the form data you would use the hash to uniquely identify where to store the data submitted.
- Every time the administrator needs to change the plugin configuration, repeat steps 3 and 4
- Finally the administrator wishes to uninstall the plugin by clicking on “De-Authorize”. Ring.io calls the De-Authorize URL: http://yourdomain.com/deauthorize?hashid=e16f38d96ea59d44cc649e32fd3fcadd740ee254ed3b05a74cd179513005d6dc This URL invokes your plugin. The code would then read the hash, search for the account in the local store, mark the account as “not authorized”, stop using the API to access this account’s data, and possibly some other cleanup tasks.
You can see the URLs as they will be rendered to your plugin by clicking on the “Test” button in the plugin configuration screen. A new window will open with the indicated URL and with the {AccountId} and {HashAccountId} correctly replaced with the corresponding values (the ID is that of your own account). This way you can test that your unhashing function works correctly, as you should be getting an integer.
The Ring.io plugin service expects to receive an HTTP 200 response code from invoking your Authorize and De-Authorize URLs. If your scripts return some other response code (HTTP 500, 404, etc), or don’t respond, Ring.io will be unable to complete the installation or uninstall of the plugin for the administrator. The administrator will get an error stating that the plugin cannot be installed because of an error. In your response, Ring.io will ignore the body of the response and just look at the header.
The IFrame Config URL needs to return a valid response containing a GUI. (It could be a blank GUI)
Plugin Security
For instructions on how to generate the Account ID hash and other security considerations check out Plugin security.
Step 3: Submit your plugin for publication.
To make your plugin public:
- Provide a title for your plugin. E.g: “Highrise CRM”
- Provide a short description of what the plugin does (150 chars or less)
- Provide a URL to a logo or image for the marketplace. The image should be fairly square, 80x80px
- Click the “Request publication” button.
Ring.io tech support will get notified and will review your plugin. Once approved your plugin will appear in the CRM Plugin Marketplace.
Plugin Security
At Ring.io we want to make every reasonable effort to protect the privacy of our customer’s data and, in developing a plugin we ask that you do too. A few things to consider:
- Keep your API token a closely guarded secret, just as you would your bank account’s online password.
- Make sure you communicate via SSL with the Ring.io API and any other CRM API that you use.
- Do not store CRM account credentials in the clear
- Restrict the hosts that can access the Authorize/De-Authorize URLs to your development client and Ring.io’s production servers. You will be receiving the requests from the admin.Ring.io.com hosts which have these IP addresses: 184.73.201.72 and 184.73.201.82
- Requests for the IFrame Config URL GUI will be coming directly from the customer’s web browser so they should be publicly available. Whenever you return the GUI for the IFrame make sure you use a hidden field to store the hash, never send back the Account ID in the clear.
How to calculate the Account ID hash.
The hash is calulated by concatenating the Account ID with your API Token, then obtaining invoking a SHA-256 hash function:
Token = “86gas86gas8gas8gas87gas”
AccountId = “45″
hash = Hash256(AccountId + Token)
assert hash == “e16f38d96ea59d44cc649e32fd3fcadd740ee254ed3b05a74cd179513005d6dc”
During the authorization process you receive the AccountId, generate the hash with the previously stored API Token and store the result as a unique identifier for that plugin installation.
During the de-authorization process or when generating the IFRame Config URL GUI you will receive the computed hash. Simply look for that hash as the primary identifier of an account’s data.
To calculate Hash256
Java
import java.security.*;
public class Sha {
    public static String hash256(String data) throws NoSuchAlgorithmException {
        MessageDigest md = MessageDigest.getInstance("SHA-256");
        md.update(data.getBytes());
        return bytesToHex(md.digest());
    }
    public static String bytesToHex(byte[] bytes) {
        StringBuffer result = new StringBuffer();
        for (byte byt : bytes) result.append(Integer.toString((byt & 0xff) + 0x100, 16).substring(1));
        return result.toString();
    }
}
Ruby
def self.digest(key)
  Digest::SHA256.digest(key).bytes.to_a.inject('') do |total,n|
    if n < 16
      # add the extra 0 to get 2 digits
      total + '0' + n.to_s(16)
    else
      total + n.to_s(16)
    end
  end
end
FAQ
I suspect my API Token may have been compromised
You can Regenerate the token from the API Access screen in the CRM section of the Ring.io website.
What happens if I regenerate the API Token?
When you change the token, Ring.io will encode all Authorization and IFrame URL requests with the newly generated token. So you will have to recalculate the hash of all the accounts in your local permanent store with the new token.
You would also use the new token to make CRM API calls.
I am getting IFrame Config URL requests with a hash that I don’t have in my local DB.
This could be a brute force attempt to access the data stored by your plug in. You could return a 404 error. If you see a pattern, please block the IP and contact Ring.io tech support.
Reference implementation
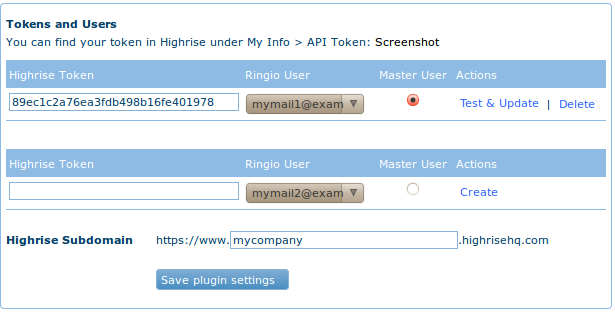
We have created and shared a plugin to synchronize Ring.io with Highrise CRM. You can try the plugin from your own Ring.io account. You will also need a Highrise account (sign up).
How it works
This plugin does 2 way sync between Highrise and Ring.io. Periodically, it will look for new, changed and deleted contacts, notes and rings and push them from one system to the other.
It also maps Ring.io users to Highrise users, so each employee can have their own data set.
Available resources
The plugin is open-source code available under the Mozilla Public License and is being hosted in a public GitHub repository. So feel free to:
- Download it and install it on your own server
- Modify it for your own purposes
- Use it as a starting point for your own plugin
- Contribute fixes and enhancements to the repository
We are also publishing the Highrise Plugin Spec (PDF) so you can use it as a template for your own plugin.
Implementation approach
Both sides offer a REST API that simplifies the process greatly and that is what we used here. We chose Ruby on Rails as it is a great framework for agile web development, with REST as one of its main principles.
The communication interface from Ruby with the Highrise API is provided by the Highrise API gem. The same happens for Ring.io with the Ring.ioAPI gem.
Synchronization
Once the Ring.io account administrators have configured the plugin with the mappings between Highrise users and the Ring.io Users, synchronization events are run periodically.
The plugin requests one side about the updated resources since the last synchronization event happened. It maps new resources between both sides internally. Then it forwards the updates to the other side. Everything is done again changing the direction (starting from the other side).
Specification details
Plugin URLs
As the packager URLs are not RESTful, we use a controller to wrap all those requests and redirect them to the proper RESTful controller. See Making a Ring.io plugin for more details.
- Authorization URL: http:// {Plugin Domain}/not_rest/create_account?rg_account_id={AccountId}
- De-Authorize URL: http:// {Plugin Domain}/not_rest/edit_account?rg_account_id={HashAccountId}
- IFrame Config URL: http:// {Plugin Domain}/not_rest/destroy_account?rg_account_id={HashAccountId}
Plugin configuration GUI
We offer this resource in the configuration IFrame that is displayed in Ring.io. It is used to map Highrise tokens to Ring.io users and to choose the proper settings for the behaviour of the plugin (currently, the Highrise subdomain).
The plugin stores the ids of every resource it synchronizes, both from Ring.io API and from Highrise API.
As there is not a direct correspondence between the fields of the resources of Ring.io and Highrise, we had to go through all the fields in both sides and choose the proper equivalence. Without getting too deep in the details, we have mapped resources like this:
| Highrise | Ring.io |
|---|---|
|
Person |
Contact |
|
Company |
Contact |
|
Note |
Contact |
|
Note |
Note |